Feeds:
Posts
Comments

Archive for the ‘BBQ and Bread’ Category

I found a person on Garden Web who has a weather station and also has the ability to poll data from surrounding weather stations, (Wunderground Weather), for the amount of chill hours. I politely asked if he could find the data for my area. Thanks to Tom on the Fruit and Orchard boards at Garden Web. He sent me the following information:

MSDLKD 2011:
below 45 chill hours: 608
45 to 32 chill hours: 593
utah chill hours: 702

MRIOSD 2011:
below 45 chill hours: 543
45 to 32 chill hours: 539
utah chill hours: 761

MELMSD 2011:
below 45 chill hours: 528
45 to 32 chill hours: 519
utah chill hours: 700

The data shows an average of around 500 chill hours which is more than sufficient for the apples, berries, etc. that I am growing. The all capital letter names are the weather station names assigned to my area. The Triple Crown Blackberries need about 500-800 chill hours which might explain why they have not emerged as strongly as my other berry plants. I have been told to be patient and wait a couple more years before I make a final judgement. I know the Boysenberry and Marionberries will be thriving. I may just let them take over if the Triple Crowns do not put on a show.

Read Full Post »

It is only January 12th and I can’t believe that I have blooms on my Anna Apple tree. Looks like we may have apples early this year. Double click on the photos below for amazing detail.

Image

Read Full Post »

My Nikon D70 has been the only camera that I have used over the last six plus years. After a few thousand shutter clicks, I noticed that my camera would not meter correctly and the lens had to be zoomed in a little to focus correctly. I have become tired of carrying around the larger body and heavy glass that comes with it.The Fuji x10 was released last month and I was instantly hooked. A small compact camera with one attached lens that has a range of 28mm to 112mm. The camera has a smaller sensor than the D70, but the sensor excels in dynamic range and low light situations. There are macro modes, image stabilization, panoramic modes, portrait, fireworks modes and more.  The Fuji x10 also has a very bright optical viewfinder and the camera is designed to look like an old range finder. The camera is built exceptionally well. Most of it is metal. The camera has all of the manual functions that a enthusiast photographer would want. It can be a bit overwhelming at times to figure out how some of the modes work, etc. There is a firmware update for this camera that will be released soon, so I hope it will take care of a few quirky issues. Over all, I give the camera a 9 out of 10 for my use.

I may revise my rating later once I feel a bit more confident. The old D70 and the accessories will be sold to offset most of the costs associated with this camera. I will miss the D70 as it has served me well. I won’t miss the weight and multiple lenses that I had to carry around.  The first photo was taken by my D70. All of the other photos were taken by my Fuji x10.

You have to CLICK on the pictures twice to see greater detail. Please !, Please ! Please! The detail in the yellow flower is amazing after the second click. 🙂

The Fuji x10 is very small and fits almost in the palm of my hand. For reference, ther is a lottery ticket in the background and part of a TV remote in the background.

The fine detail is exceptional. My Nikon D70 did not have a macro mode. I am going to enjoy this feature the most when it comes to flowers and bugs.

Another fine example of Fuji x10 macro mode. Nice color and detail for such a small sensor.

This camera loves low light situations. No flash used here. Just the ambient light from the windows off to the right.

Some animals at Sea World San Diego. (Camera Fuji x10)

Nice colors. (Fuji x10 at Sea World San Diego.)

Jakey next to our master bedroom window. This shot was extremely under exposed and required a lot of post processing. (Camera: Fuji x10)

Read Full Post »

My wife bought me a Camp Chef propane Oven Stove from Costco on Father’s Day. I wanted to test this oven on a loaf of frozen bread dough that I obtained from Walmart before I went camping for “real”. I still have to figure out the lighting on this unit. It has an instant start, but I find that it takes two to three slow turns before I get a flame that will not burn out. When I try to turn the oven off, the knob will occasionally stick and I need to jiggle it a little. I know that the knob needs to be pushed in before turning. It could be that I need use a little finesse and read the manual again. Overall, I am VERY pleased with this unit and give it a strong “BUY”.

This Camp Chef Oven Stove combo works great! It should add some comfort on our car camping trips.

I decided to use some frozen dough that I purchased from Walmart. You can see the loaf beginning to thaw and rise.

The bread pan was also purchased at Walmart. The bread slid out nice and easy with no cooking spray!

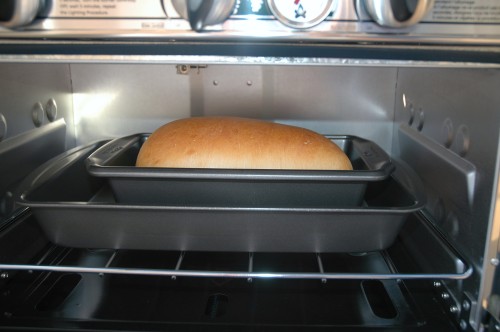
I placed the bread dough in the oven when the temperature hit 350 degrees. I placed the bread pan in another cake pan to act as a heat diffuser. It may have not made any difference, but I did not have a burnt loaf, so it did give me peace of mind.

As you can see, the stove is very roomy and and can accomodate most 13 x 9 inch pans.

After 25-30 minutes at 350 degrees, the loaf began to get nice color. The temp on the stove wanted to climb well over 450 degrees, so I propped the door open and the temp came back down to 350 degrees. For safe measure, I rotated the pans one time to avoid uneven baking. I am not sure if it was needed in the first place.

The finished loaf! It slid right out of the pan.

The loaf appears to have been burned on the bottom right, but it wasn't! Yes it was darker, but the bread came out nearly perfect. I would have taken the loaf out a minute or two earlier, but the family loved it. At about 80 cents a loaf, it is a fairly good bargain too.

My six year old ate two slices and manage to sneak some more when I was cleaning up the kitchen after dinner. He only weighs 39 pounds and eats very little. I think the bread was a hit with him.

I purchased some cheap pans from Walmart. Most of their 13 x 9 pans fit with room to spare.

Walmart Pan

A nice inexpensive cake pan.

A 13 x 9 cupcake pan obtained at Walmart

Read Full Post »

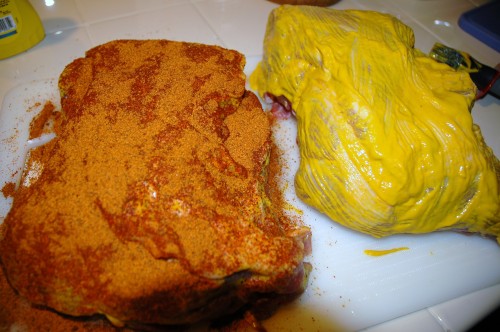
I decided to fire up my Masterbuilt XL Propane Smoker to slow cook 4 pork shoulders. Two were for a family get together and 2 went to my in-laws.  I usually purchase my pork shoulders from Costco. They come two to a pack and the bones have been removed with a little fat trimming as well.  I start by washing the shoulders in cold water and the patting them dry with a paper towel. The next step may surprise you. I slather them up with mustard to give the pork rub something to hold onto.The mustard does not add any perceptible flavor to o the meat. You have to trust me on this, I have smoked at least 200 pounds of pork shoulders and not a single person could taste the mustard. When using the rub, use it liberally. You can see I love making messes, by  looking at the pictures below. Once the meat is rubbed, bring the meat up to a temp of 165 degrees. At 165 degrees the pork shoulders are double wrapped in heavy duty aluminum foil and placed back into the smoker until the temps hit 200. They are then pulled out of the smoker and place into a cooler with beach towels to break down a little more before serving.

I use 4 to five chunks of pecan wood for the smoke flavor. The following pictures document most of the process that was discussed. Since I was getting tired of an all nighter at the smoker, I did not get the final product pictures.

Lot's of mustard and lots of rub. You need to make a mess to have some good que...

Both shoulders rubbed on both sides.

Looks like I have some cleaning to do!

Did I say that I like to use a little mustard and some rub?

That is 4 pork shoulders loaded into the smoker at 2:00 AM. These should be ready in 10 to 12 hours.

pecan wood chunks

I only used five of the biggest chunks of Pecan about the size of a closed fist.

The pork shoulders are about 1/2 done. 5 to 6 more hours to go. Notice the probe wires on the top rack for the meat thermometers?

I have two cheapo wireless meat thermometers that tell me when the temps hit the right point to foil and later when to remove the meat.

The setup I use is the Masterbuilt XL Propane Smoker.

Zoey is smelling the pork shoulders and is hoping that I might drop one of them as I remove the shoulders from the smoker.

Sometimes simple is cheap too. $2 at Walmart. Just plain old pork rub by Grill Mates.

At 165 degrees the pork shoulders are double wrapped in heavy duty aluminum foil and placed back into the smoker until the temps hit 200. They are then pulled out of the smoker and place into a cooler with beach towels to break down a little more before serving.

I also cooked two double sized loaves of no-knead bread for the occasion. See my other post on making the no-knead bread in my cast iron dutch oven.

Can you believe that I turned 45? Time is a slippin......

Read Full Post »

I have been cooking No-knead bread for a couple of years now and feel dangerous enough to experiment with different creations. I made two loaves tonight. Just a plain loaf that the kids wipe out in no time and a sun dried tomato version that was tasty, but not quite what I was looking for. The plain version is very simple. Just be sure to not add too much water. Stir in only what is needed to get a barely sticky ball of dough. I have not used a cup and a half on occasion due to the flour used or environmental conditions.

You can get more information from here. There is a nice video to show the steps.

No Knead Video and other useful information.

3 cups all purpose or baking flour.

1.5 Cups water

1/4 teaspoon of instant yeast

1.5 teaspons of salt.

Mix the ingredients in a bowl and let sit for 12-18 hours. Take the very sticky mess out of the bowl and flatten it out and fold into thirds.

Let the bread rise or proof another 1.5 hours and then cook in a preheated dutch oven or baking dish for 30 minutes covered.

Drop the temp to 450 and cook 15 minutes uncovered.

Here is the final product.

No Knead Bread

Your basic loaf of No-Knead Bread

I did not take pictures of the sun dried tomato loaf when finished. I did not mix the bits of tomato well enough into the loaf.  Made for a weird loaf that is for sure. Here is a pic of the loaf proofing before I throw it into the dutch oven.

No Knead bread sun dried tomato experiment. Although tasty, not what I was looking for.

I use a 10 inch cast iron dutch oven by Lodge. It is a 5 quart DEEP oven. Not the regular 10 inch oven. You can buy baking dishes but they need to have a tight cover. The bread gets a hard artesian crust because it is steamed inside the baking dish. I will sometimes double the recipe and use a Lodge 12 inch deep oven. I do sprinkle some corn meal on the bottom of the dutch oven for some extra texture and to aide in the loaf not sticking. Notice the baking sheet under the dutch oven? It helps deflect the heat so the bottom of the loaf does not get dark.

This cast iron dutch oven is preheated to 500 degrees to ensure that the bread has a nice crispy crust.

Read Full Post »